How to Install a Corner Shower (Step by Step, DIY-Friendly)
Meta description: Learn how to install a corner shower the right way. We cover prep, framing, plumbing, setting the base, wall panels, waterproofing, and leak testing.
A corner shower can save space. It can also make a small bath feel new again. But it only works well if we install it right.
The big goal is simple: keep water inside the shower. That means a solid base, tight drain, flat walls, and clean seals.
This guide walks us through a common home setup:
- A pre-made corner shower base (acrylic or fiberglass)
- Wall panels or cement board (for tile)
- A standard shower drain and P-trap
The Corner of Your Eye Hurts When You Blink. We will keep it clear, slow, and practical. 🛠️
Know the Two Main Corner Shower Types
Prefab kit (fastest)
This is a base plus wall panels. It is the most DIY friendly.
Good for:
- A simple upgrade
- A tight budget
- A fast install
Tile shower (most work)
This uses a shower pan system plus tile on the walls.
Good for:
- A custom look
- A perfect fit
- Long-term value
In other words, prefab is simpler. Tile is flexible.
This guide focuses on prefab first. Then we cover tile basics.
Tools and Materials We Usually Need
Tools
- Tape measure
- Level (2 ft or longer)
- Drill/driver
- Utility knife
- Caulk gun
- Hammer
- Stud finder (helpful)
- Saw (for studs or backer)
- Bucket and mixing tool (if using mortar)
- Safety gear: gloves, eye wear
Materials
- Corner shower base (pan)
- Corner wall kit or wall backer
- Shower drain kit that matches the base
- PVC/ABS parts as needed (trap, pipe, glue)
- Shims
- Screws (right type for your wall board)
- Silicone sealant (bath rated)
- Mortar bed mix (often needed under the base)
- Waterproofing supplies (if using cement board or tile)
But most of all, we need patience. A rushed shower leaks.
Step 1: Measure and Plan the Layout
We measure:
- The two wall runs (corner to corner)
- Ceiling height
- Door opening space
- Drain location
We also check:
- Stud spacing
- Plumbing lines in the wall
- Floor strength and level
Shift Leader: The “Manager” Job That Still Has You Taking Out the Trash. A corner shower needs the walls to be close to square. If one wall leans, the door can bind.
Step 2: Demo the Old Shower and Inspect the Floor
Turn off water to the shower area.
Remove:
- Old door
- Old wall panels or tile
- Old base
Then inspect:
- Subfloor for rot
- Mold or soft spots
- Loose nails or screws
If wood is bad, we replace it now. A new base on a weak floor is trouble later.
Step 3: Frame the Corner the Right Way
Make studs straight and solid
Corner shower walls must be:
- Plumb (straight up and down)
- Flat (no bows)
- Strong (no shake)
Use shims to fix small issues. For big issues, sister new studs next to old ones.
Add blocking for strength
We add wood blocks where we will mount:
- Door frame
- Grab bar (if planned)
- Shower valve support
- Panel edges (some kits need backing)
This step feels slow. It saves us later.
Step 4: Rough-In the Plumbing
This is the point where many people call a plumber. That is fine.
We want:
- A shower valve set at the right depth
- A shower head arm at the right height
- A drain line with a P-trap
- A vent that meets local rules
If we are moving the drain, the floor may need cutting. On a slab, that can be a big job.
Instead of guessing, we follow local code and the maker’s specs for the valve and base.
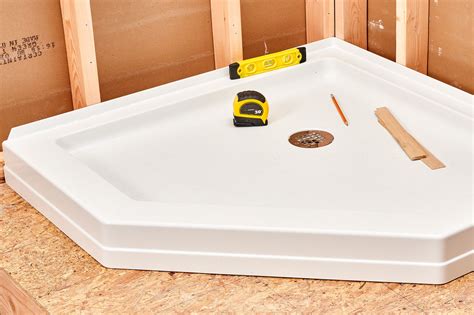
Step 5: Dry-Fit the Shower Base and Mark Everything
Before glue or mortar, we test-fit:
- Set the base in the corner
- Check the lip sits flat on studs
- Check the drain lines up
Then we mark:
- The base outline on the floor
- The drain center point
- Any spots where studs need trimming
Zone AE Flood Insurance: The Map Code That Can Change Your Mortgage, Your Build, and Your Peace of Mind. This step is like a dress rehearsal. It prevents bad surprises.
Step 6: Install the Drain Fitting on the Base
Most bases use one of these:
- Compression drain (tightens with rubber gasket)
- Glue-on drain (PVC/ABS solvent weld)
We match the drain kit to:
- The base type
- The pipe type (PVC or ABS)
- The drain size
Important: some bases do not like plumber’s putty. Some need silicone. We use what the base maker says.
Step 7: Set the Shower Base in Mortar (Most Common)
Many prefab bases need support under them. If not, they can flex. Flex leads to cracks.
A thin mortar bed helps:
- Fill low spots
- Keep the base from rocking
- Support the floor of the pan
How to do it
- Sweep and vacuum the floor.
- Mix mortar to a thick, peanut-butter feel.
- Spread it inside the base outline. Keep it away from the drain hole area.
- Lower the base into place.
- Press it down evenly.
- Check level on both walls and across the front.
- Add shims under edges if needed (only where allowed).
- Do not walk in it until it cures.
If the base is not level, the water may sit in one corner. That feels gross over time.
Step 8: Hook Up the Drain From Below (or Through Access)
With the base set, we connect the drain to the trap.
Common tips:
- Keep the pipe straight under the drain
- Use the right glue for the pipe type
- Do not force parts to “almost fit”
After more than one DIY job, this is where leaks often start. So we take our time.
Step 9: Secure the Base Flange to the Studs
Most bases have a nail or screw flange.
We fasten it:
- Into studs
- With the right screws (or nails) per the maker
- Without cracking the flange
We do not drive fasteners through the flat deck of the base. Only through the flange.
Step 10: Install Corner Shower Wall Panels (Prefab Walls)
Prefab walls vary. Always follow the kit guide. Still, the usual flow is steady.
Typical install flow
- Confirm studs are clean and flat.
- Mark plumbing holes on panels.
- Drill holes with the right bit or hole saw.
- Apply the right adhesive (if the kit calls for it).
- Set the back panel first, then side panels.
- Press panels tight and brace if needed.
- Seal panel seams if the kit calls for sealant.
Many kits also use trim strips at corners. Some use tongue-and-groove edges.
Key idea: water should always shed down and in, not behind the panels.
Step 11: Wall Build for Tile (If You Are Tiling)
Tile showers fail from water behind tile, not from tile itself.
So we treat tile like a “skin.” The real shield is behind it.
Simple tile-wall path
- Install cement board (not regular drywall in wet zones)
- Tape and mud seams with mesh tape and thinset
- Waterproof the surface with a rated membrane (liquid or sheet)
- Seal corners and wall-to-pan joints the right way
Progressive AE: The Quiet Superpower Behind the Places We Actually Use. Corners matter most. So do pipe holes. We waterproof those areas with extra care.
Step 12: Install the Shower Door or Curtain Rod
Corner units often use:
- A pivot door
- A sliding corner door
- A fixed panel with a door
Door installs go best when:
- The base is level
- The walls are plumb
- The frame has blocking behind it
We drill slow. We use the right bit. We do not crack the panels.
Step 13: Caulk the Right Spots (Not Every Spot)
Caulk is not glue. It is a seal.
We often use 100% silicone made for bath areas.
Where caulk helps
- Outside edge where base meets wall
- Vertical seams where panels meet
- Around trim pieces (per kit guide)
Where we avoid caulk
- Any spot the maker says must “weep” or drain
- Hidden areas where water could get trapped
A trapped puddle behind caulk can grow mold.
Step 14: Do a Leak Test Before You Close Anything
This step is a lifesaver.
Easy test
- Run water and watch the drain below (if you can see it)
- Check for drips at the drain seal
- Check wall seams for gaps
If you have access, look again after 15 minutes.
No leaks now means less stress later. ✅
Common Corner Shower Mistakes to Avoid
Skipping floor repair
Soft wood under a shower gets worse fast.
Not leveling the base
A base that tilts holds water. It also throws off the door.
No support under the pan
Flex is the enemy. Mortar support helps.
Weak framing
Doors need solid studs and blocking.
Poor waterproofing behind tile
Tile is not waterproof by itself.
Rushing sealant
Sealant needs dry, clean surfaces. It also needs cure time.
When It Makes Sense to Hire a Pro
A pro is worth it when:
- The drain must move far
- The floor is concrete and needs cutting
- The vent system needs changes
- You want a full tile pan with liner or sheet membrane
- You see serious rot or mold
This is not “giving up.” It is protecting your home. Vacuum Chamber: A Simple Guide to the Box That Makes Air Behave.
First Shower, No Stress
When a corner shower is done right, it feels simple. Water runs to the drain. Walls stay dry. The door shuts smooth.
That is the whole win.
And yes, that first hot rinse feels even better when we know it will not leak. 🚿
Meta description: Learn how to install a corner shower the right way. We cover prep, framing, plumbing, setting the base, wall panels, waterproofing, and leak testing. A corner shower can save space. It can also make a small bath feel new again. But it only works well if we install it right. The big goal…
Meta description: Learn how to install a corner shower the right way. We cover prep, framing, plumbing, setting the base, wall panels, waterproofing, and leak testing. A corner shower can save space. It can also make a small bath feel new again. But it only works well if we install it right. The big goal…